Total Pageviews

Friday, 19 April 2013

AIR PREHEATER ( LUNJSTORM) FOR BOILER ERECTION PLAN PART-2


Air preheater erection can be started just after erection of last ceiling girder and can be continued

along with Pressure Part erection. However approach for pressure part  should be kept open.

For Boiler where Air heaters are installed in second pass approach from rear and both sides

should be available. Two other issues may crop up i) Construction of fan foundations ( PA & FD)

ii)  Erection of ducts just above Air heater. It is noticed that approach area at the rear gets

congested early because of multi- discipline starting of erection work like ESP , SG , coal

gallery , Ash handling work , duct support , electrical tray work etc. Therefore it needs good

planning and idea about the priorities for all the above work otherwise conflict bound to happen

and derails the time schedule.

P.S If  you are looking to earn few legitimate extra money from the comfort of your home then please click on the link given below

LINK 1 - PLEASE CLICK HERE 
LINK 2 - PLEASE CLICK HERE


Wednesday, 17 April 2013

AIR PRE HEATER FOR BOILER IN THERMAL POWER PLANT

We have completed our discussion on Steam Generator structural and Pressure part erection

work. Small tips were also provided to construction worker which i think will be useful during

actual erection work. After completing the structural and pressure parts it is time now to discuss

about other main equipment like AIR PRE HEATER.


An Air Pre heater (APH) is a general term to describe any device designed to heat airbefore
another process (for example, combustion in a boiler) with the primary objective of 
increasing the thermal efficiency of the process. They may be used alone or to replace a 
recuperative heat system or to replace a steam coil.
Air pre heaters are mainly two types (i) Tubular Airheater  (ii) Ljunstorm rotary air pre heater
bisector or trisector. Tubular air heater is now becoming an obsolete equipment only can be
seen in old and small capacity power house. However use of Ljunstorm air heater is common
to any size of unit. There are advantages and dis advantages for both type of air pre heater in 
use. We will confine our discussion only on Ljunstorm air preheater erection.
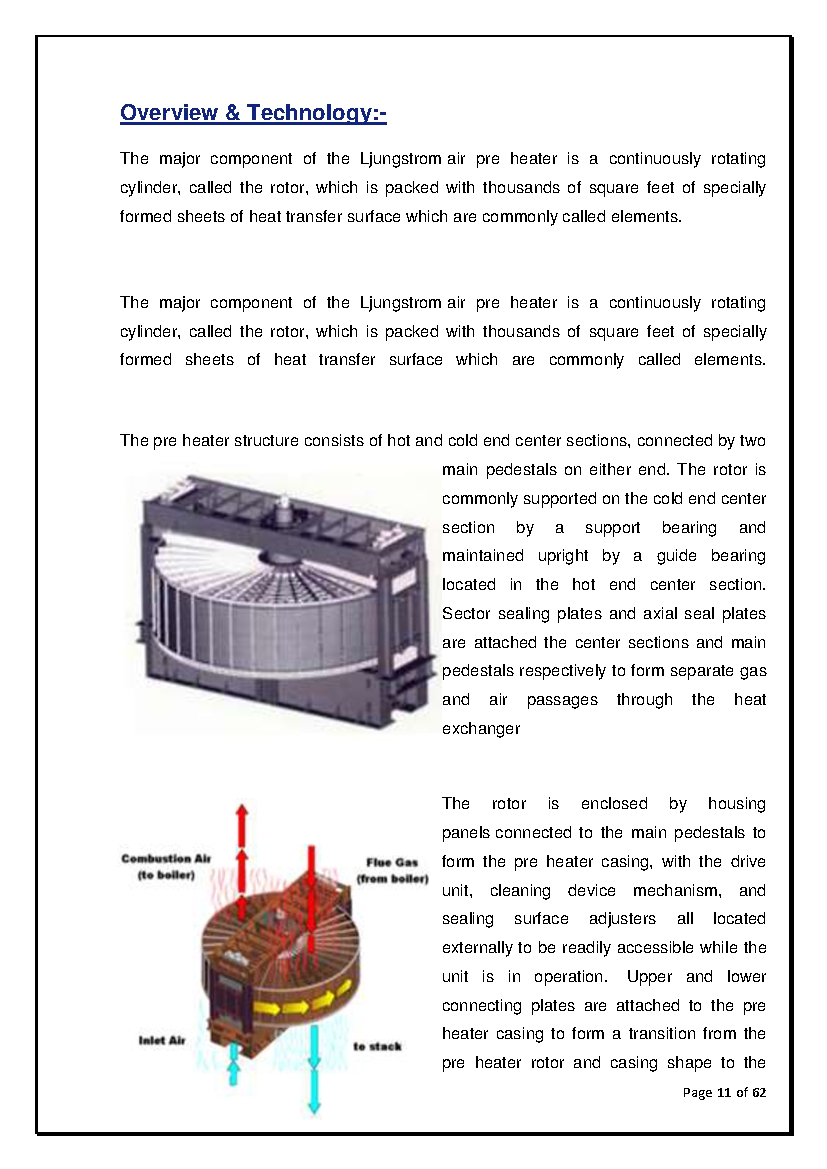
The picture above shows the overall construction feature of Ljunstorm air pre heater'


Names of the main parts of the LJUNGSTROM APH are:-
      1)    Expansion block (08)        
2)    Cold centre section (01)
3)    Main pedestal (02) 
4)    Side pedestal (02)
 5)     Guide bearing Assy (01)   
 6)    Support bearing Assy (01)
 7)    Rotor post (01)
 8)    Cold pocket ring (08)
 9)    Hot pocket ring (08) 
10) Hot centre section (01)
11) Cold end tension rings (08)
12) Hot end tension rings (08)
13) Drive pedestal (01)  
14)  Rotor drive unit
15) Guide bearing oil circulation unit
16)  Support bearing oil circulation unit
17) Rotor stoppage alarm sensor
18) Soot blowing system
19) Leakage control system     
20)  Shop assy modules (09)
21)  Semi modules (09) 
22) Gratings (72)
23) Baskets(heating elements)
24) Duct corner Assy (08)
25) Seismic stoppers (08)        
26) Rolled panels/Casings (16)
27) Field insulation 
28) Thermocouple for temperature Measurement.


Picture shows the location of Air preheater in a boiler ( having mills on the side) . PAPH stands
for Primary Air Preheater ( Left and Right) and SAPH stands for Secondary Air Preheater (Left 
and right)

Picture above shows Air Preheaters are in advanced stage of erection including interconnecting duct.

to be continued.
P.S If  you are looking to earn few legitimate extra money from the comfort of your home then please click on the link given below


Thursday, 11 April 2013

CONSTRUCTION TIPS ON PRESSURE PARTS ERECTION FOR A THERMAL POWER PLANT.


Colour Coding of filler wire

Specification                                   Brand Name            Colour Code

RT ½ Mo (ER 80s-D2)                      TGSM                        Green

RT 1 Cr ½ Mo (ER 80s –B2)           TGS 1CM             Silver grey/white

RT2 ¼ Cr 1 Mo (ER90s –B3)          TGS 2CM             Brown /Red

RT 9 Cr 1 Mo ¼ V                            TGS9Cb                     -

RT 347 (ER 347)                               TGS -347             Blue

Low and extra low Hydrogen Electrodes    

As per IIW (Indian Institute of welding) classification of Hydrogen

Content classify electrodes is given below.

High   : greater than 15 ml /100gm

Medium: 10-15 ml /100gm

Low: 5-10 ml /100 gm

Extra low: less than 5 ml /100 gm

Baking, Storage and Handling

The electrodes have tendency to pick up moisture when exposed

to atmosphere and the amount depends on the time, relative humidity

and also the type of coating on the electrode. The recommendation

of baking electrodes are given below.

AWS Classification              Baking temperature & Time   Holding temp

E-7018                                 250-300 & 2 hrs                        100 deg C

E-7018 -1                            250-300 & 2 hrs                        100 deg C          

E-7018- A1                         250-300 & 2 hrs                        100 deg C

E -8018 –B2                       250-300 & 2 hrs                        100 deg C

E-9018- B3                         250-300 & 2 hrs                        100 deg C

E-8018- B2L                      250-300 & 2 hrs                         100 deg C

E-9018 –B3L                      250-300 & 2 hrs                        100 deg C

E309 & E347                      250-300 & 1 hr                          100 deg C     

** - After issue the electrode from site store to welder the temperature

Portable oven should be around 65 to 70 deg C during actual use by welder.

This is not applicable to E309, E347 and E 6013.

Selection of electrodes for non –pressure parts work

Material P1 + P1

A. For butt welds, up to 6mm inclusive:  E6013
                                      
                                       > 6mm            :  E7018

B. For fillet welds up to 8mm inclusive    :  E6013
                                      
                                    > 8mm                   :  E7018

Carbon Steel + P1                                     : E6013 or E7018

Carbon steel + Carbon Steel                     : E8018 –B2

Note: E6013 can be used for all non load carrying welds of all thickness

of IS2062 plates 20mm thickness and 8mm fillets. For structural material

like Ceiling Girders thickness of material is > 63 mm needs preheating (120

Degree C) and stress relieving (600-700 degree C) depends on material.

Common Knowledge required by construction supervisors engaged in boiler work

Weight Calculation for tubes:-

W = (D-1.1425t) x 1.1425t x 0.024466 Kg/M
           
            W= Weight of the tube in kg/M
            D = Specified outside diameter in mm
            t = Specific thickness

Weight Calculation For pipes:-

W = (D-t) t x 0.02466 kg/M
         
           W- Weight of pipes in Kg/M
            D- Specified outside diameter
            t - Specified thickness

Weight Calculation for ID controlled pipes/tubes
  
W = (Dot) t x 0.02466 kg/M
           
            W- Weight of pipes in Kg/M
            D- Specified outside diameter
            t - Specified thickness

 Temperature Measurement

For measuring the stress relieving temperature we generally use

Thermocouples. The thermoelectric voltage in a thermocouple depends

 on the temperature difference between two junctions and is used and

is used for the purpose of temperature measurement when one of the

temperature is known. At project site we use Chromel – Alumel thermocouple

popularly known as “ K “type.

Colour Code of thermocouple is yellow (+) and Red (-) over all Brown.
(Polarity +/- should be known otherwise it will give erroneous reading)

Thermocouple extension wire Yellow (+) and Red (-) overall yellow.
(Thermocouple can only be connected by thermocouple extension wire not
by any other wire)

There are other types of thermocouple but in India “K” type is only used at
the project site. The temperature – milivolt curve is linear. The increase is
4.13 mv per 100 degree C. (approximately)

Radiography Source

In India for industrial radiography we use two type of source i.e Cobalt -60

and Iridium -192. Out of that use of Cobalt -60 is extremely unpopular

because it requires stringent safety precautions to be followed and it

affects the progress of work. Instead of cobalt -60 now a day’s all are

using ultrasonic machine to detect the fault. Ultrasonic machine requires

Test block (made of same material to be tested) to be made as per the

Specification of IIW.

Iridium -192 is having half life of 74.4 days. All our pipes and tubes are

Radio graphed by this source except pipe /structural thickness of > 60 mm.

In those cases only UT is performed. The Iridium source should be more

than 30 Curie strength. It will require less exposure time and time can be

saved. Exposure time is inversely proportional to the strength. In 500MW

/660 MW boiler around 10,000 to 12000 shots are taken.

For surface defects of welds two very simple tests are carried out (i) Magnetic
particle test (ii) Dye Penetration test. 

P.S If  you are looking to earn few legitimate extra money from the comfort of your home then please click on the link given below

LINK 1 - PLEASE CLICK HERE 

LINK 2 - PLEASE CLICK HERE


Thursday, 4 April 2013

COMMON KNOWLEDGE OF PRESSURE PART WELDING FOR BOILER IN THERMAL POWER PLANT

There are few basic information required to carry out the erection / construction of

pressure parts of boiler. These items are described briefly below for ready reference.


The welding of all pressure parts and high pressure piping shall be in accordance

 with the following requirements:

Qualification of Weld Procedures


All the welding procedures adopted  shall be qualified in accordance with the latest

applicable requirements of Section IX of ASME code before the work is begun.

Certified welding procedures for welding of pressure parts and piping's  should

contain the type of material, material thickness, the joint details, the pre-heat

temperature maintained, the post weld heat treatment given and the welding current

and the voltage used during qualifications of welding procedures.

Welder's Qualification                 


Only welders, qualified in accordance with the latest applicable requirements of

the Indian Boiler Regulations, shall be permitted to perform any welding work

on the pressure parts. In addition to such statutory qualification requirements,

the welders shall also perform a satisfactory pre-production qualification test to

be conducted at site in consultation with site welding engineer . The services of

an independent testing laboratory can be retained  to perform welder qualification

tests for welders.

All the welders carrying out welding at site, shall carry an identification badge,

which shall indicate the category and the grade of welding for which they have

been tested and authorised to carry out welding. All such badges shall be presented

on demand to the inspection authority.


All records of the welding procedures, the welder's qualification tests and

the welders' performance details for the work performed shall be maintained .

The names of all the welders who made each weld on the boiler pressure parts and

piping within the jurisdiction of the Indian Boiler Regulations shall be maintained .

The certified copies of any or all the above documents shall be submitted to

authority on demand. Marking of welded joints to be done as per norms.

HEAT TREATMENT


Pre-heating, post-heating and post - weld stress relief operations of all welds, shall be

performed in accordance with the requirements of applicable code. Local post weld

stress relieving heat - treatments shall be adopted only in cases where it is normally

impracticable to subject the entire assembly as such for stress relieving operations.

Heating may be by means of electric induction coils or electric resistance coils.

Oxyacetylene flame heating or exothermic chemical heating methods will not be

permitted. Complete recording of the temperatures through out the stress relieving

cycle of the material and the weld subjected to heat treatment shall be made by means

of a potentiometric recorder. Recorders other than those of potentiometric type shall

not be used for such temperature recording during stress relieving operations.


After setting up the weld joint for heat treatment operation, signatures shall be obtained

on the strips chart of the recorder prior to starting of heat treatment cycle. The right

hand corner of the strip chart at the starting point of the heat treatment cycle shall

contain details like the weld number, material, diameter and thickness, method of

heating adopted, prescribed ranges of heat treatment temperatures, date of heat treatment,

reference to item number of the Field welding Schedule.


FIELD WELDING SCHEDULE

Field welding schedule should contain following information:


a) Drawing No (s)

b) Location of the weld

c) Size of the weld (outside diameter and thickness)

d) Type of joints

e) Material specifications

f) Size of fillet on backing ring, when the type of joint is with backing ring

g) Electrode/ filler metal specifications

h) Number of welds per unit

i) Quantity of filler metal per weld

j) Indication of required Non-destructive Examination (NDE) for each weld

k) Pre-heat temperatures for welding

l) Process of welding

m) Post-welding heat treatment temperature ranges, duration, entitled 'Qualification of Weld Procedures' .

Continued to part-III

P.S If  you are looking to earn few legitimate extra money from the comfort of your home then please click on the link given below

LINK 1 - PLEASE CLICK HERE 
LINK 2 - PLEASE CLICK HERE


Tuesday, 2 April 2013

CONSTRUCTION PLAN FOR PRESSURE PARTS- SCHEDULE FOR 11MONTHS PART -IIn


Continued from last dispatch about erection plan for pressure Part of

super critical boilers


6th month erection schedule

Furnace Rear wall Interim Header

Furnace  Rear wall  Intermediate Header
Furnace lower buck stays

Upper furnace key buck stays

Lower Furnace key buck stays

Low Temperature Re Heater inlet header

Low Temperature Re Heater coils lower


7th month erection schedule

Furnace Lower Spiral  Rear  wall panels

Furnace guides

Economiser outlet header ( after pre-assembly)

Economiser outlet terminal tubes (after pre-assembly)

Economiser miscellaneous items  supports, suspension etc

8th month erection schedule

Circulation system for feed water

Furnace loose tubes for connecting furnace corners , burner panel etc

Pressure Parts attachment items

Economiser coil upper assembly ( after pre- assembly

Economiser intermediate plain tube ( after pre-assembly)

Recirculation pump and its piping etc (coming under Trim piping group)

9th month erection schedule

Furnace front ,rear and side (L & R) header lower after pre-assembly

Furnace bottom support after pre-assembly

Expansion movement attachment, seal boxes arrangement etc

Super heater & Re heater spacer tubes

Economiser inlet header ( after pre-assembly)

Economiser coil assembly lower ,Economiser Feed pipe and link etc

Economiser outlet link etc

10th and 11th month schedule

LRSB ( long retractable soot blower) mounting on furnace

wall de slagger mounting on furnace

Temperature probe

Root valves for vent and drains

Boiler Recirculation Pump and piping

Starting of trim piping line ( soot Blower piping)

Attachment work like door ,peep hole etc ,Supports of economiser line etc

Mixing vessel , CBD and IBD tank , piping , vent piping etc.


Schedule mentioned above is tentative and hold good for matching supply . This can be 

varied as per requirement of site as per availability of material. We have not mentioned

the pre- fabrication of crown plates. This is a major activities and can be started with

ceiling girder pre-assembly if material (alloy steel ) plates are  available. The pre- 

fabrication involves welding , pre-heating and post heating also. For pressure parts

erection we require 10 to 12  electrical winches  ( 2 nos 10 T , 4 to 6 nos 5T ,rest 

can be 3T) with 10000 mtrs wire rope 12 mm 19mm will be required . The winches 

are to be positioned side of the main column. The level of winches should be 1 M

above the ground level so that winches remain unaffected due to accumulated water

below. Large number of max puller ,chain pulley blocks will be required ( more than

100 numbers). 

Welding of pressure parts start from zero dates of pressure parts at pre-assembly bed.

We are not going to discuss about welding here as this is specialised subject but

information required for construction will be shared.


P.S If  you are looking to earn few legitimate extra money from the comfort of your home then please click on the link given below

LINK 1 - PLEASE CLICK HERE 
LINK 2 - PLEASE CLICK HERE